How Do I Add a Gallery to My Website?

To add multiple images in one place, you can use the Gallery widget. This widget allows you to upload an unlimited number of images and organize them into a gallery on your website.
In the Gallery widget, you can use images from the image library of your website or upload your custom pictures (up to 20 different images at the same time).
Note:
The size of uploaded images should not exceed 5 Mb. In case one of the images you are adding to the website is more than 5 Mb, the images won’t be uploaded successfully.
When loading multiple images at the same time, they will appear in the order depending on how quickly each picture has been uploaded to the builder.
Tip:
If you want to change the order the images show in the Gallery widget, you can switch to the Slideshow view and arrange images the way you like by dragging pictures at the bottom.
At the moment, there are two Gallery widgets in the Builder: the updated Gallery New version with new features and the old Gallery version. The old version can be found in the Old widgets section.
Note:
You can enable/disable the old widgets in the Settings section on the dashboard:

The Gallery New widget setup
You can change the image order in the Gallery, duplicate the uploaded images, or delete unnecessary ones. Just click on the Edit gallery button that will appear above the widget when you click on it. To change the image order, left-click an image and drag it to the desired place.

In the image settings, you can replace the images uploaded to the Gallery previously, add title and alt attributes, as well as crop the images. To access these settings, go to the widget settings and click on the image in the Gallery.

There are 3 designs available for the Gallery New widget:
- Grid
- Collage
- Slider
Grid
If you select the Grid design, you will get images of the same aspect ratio (proportions of the height and width of an image). For this kind of design, the images can be cropped if their aspect ratio exceeds the aspect ratio of the picture in the widget. Available settings for the Grid design are:
- Number of columns — you can set up the number of columns the images will be arranged into
- Image padding — you can enable or disable padding, as well as change it clicking on the “gear” icon
- Caption — you can toggle the captions to the Gallery images and select their location, alignment, and color: just click on the “gear” icon
- Preview on click — will allow your visitors to see the enlarged picture on a click
Collage
If you select this design, the pictures in the Gallery will be arranged automatically in the random order depending on the aspect of the uploaded images. Available settings for the Collage design are:
- Collage design — the images will be arranged in the way you choose from the design options
- Image padding — you can enable or disable padding, as well as change it clicking on the “gear” icon
- Caption — you can toggle the captions to the Gallery images and select their location, alignment, and color: just click on the “gear” icon
- Preview on click — will allow your visitors to see the enlarged picture on a click
Slider
This Gallery design looks pretty much like the Slider widget and works the same way, however it doesn’t allow you to set the underlay color. One more difference from the Slider widget is that you can upload an unlimited number of slides to the Gallery widget. Available settings for the Slider design are:
- Arrows — you can enable or disable the arrows for switching the slides, as well as select their color and design
- Navigation design — here you can set up the way the Slider images will switch, as well as select their color and location
- Caption — you can toggle the captions to the Gallery images and select their location, alignment, and color: just click on the “gear” icon
- Preview on click — will allow your visitors to see the enlarged picture on a click
- Autoscroll — enables automatic scroll of the Slideshow images. You can select a speed of switching to the next slide
- Loop mode — if you toggle this, the first slide will be displayed after the last one to make them loop
- Animation — this option allows you to select the type of animation that will be used when the Gallery switches to the next slide
The Gallery widget setup
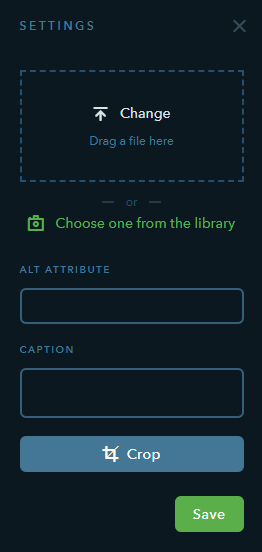
In the image settings, you can replace the images uploaded to the Gallery previously, add captions and alt attributes, as well as crop the images. To access these settings, click on the Gallery, mouse over an image and click on the “pencil” icon in the top left. You can also remove an unnecessary image from the Gallery by clicking on the “trash can” icon.

There are 3 designs available for the Gallery widget:
- Grid
- Collage
- Slideshow
Grid
If you select the Grid design, you will get images of the same aspect ratio (proportions of the height and width of an image). For this kind of design, the images can be cropped if their aspect ratio exceeds the aspect ratio of the picture in the widget. Here are the settings available for the Grid design:
- Number of columns — you can set up the number of columns the images will be arranged into
- Click to enlarge — will allow your visitors to see the enlarged picture on a click
- Show caption — if you toggle this, visitors will see captions to the Gallery images. You can select the way the caption will show: either on hover or permanently under the picture
Collage
If you select this design, the pictures in the Gallery will be arranged automatically in the random order depending on the aspect of the uploaded images. Available settings for the Collage design are:
- Click to enlarge — will allow your visitors to see the enlarged picture on a click
- Show caption — if you toggle this, visitors will see captions to the Gallery images. You can select the way the caption will show: either on hover or permanently under the picture
- Orientation — the images will be arranged horizontally or vertically depending on your choice
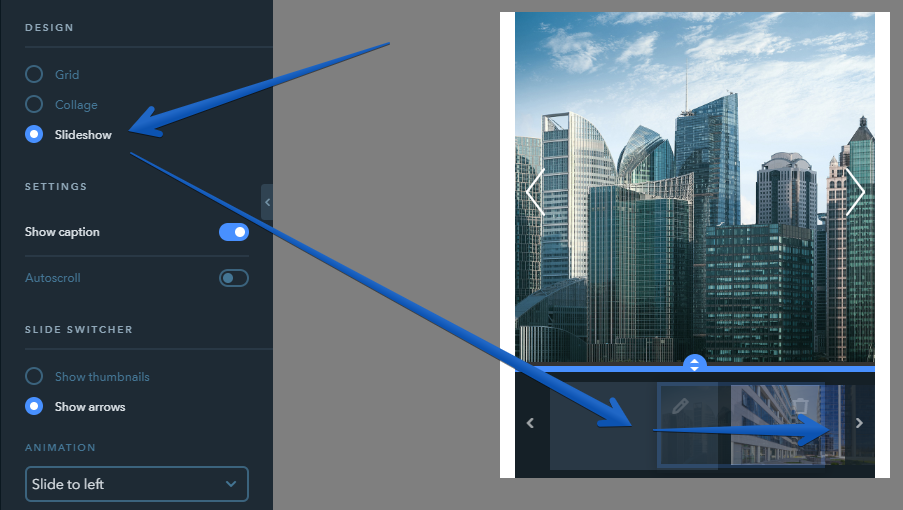
Slideshow
This Gallery design looks pretty much like the Slider widget and works the same way, however it doesn’t have an overlay with a button. One more difference from the Slider widget is that you can upload an unlimited number of slides to the Gallery widget. For the Slideshow design, you can configure the following:
- Show caption — if you toggle this, visitors will see captions to the Gallery images
- Autoscroll — enables automatic scroll of the Slideshow images. You can select a speed of switching to the next slide
- Slide switcher — here you can set up the way the Slideshow images will switch. It can be done either with the help of the switch arrows or with the thumbnails of the images that a visitor should click on in order to see a larger picture
- Animation — this option allows you to select the type of animation that will be used when the Gallery switches to the next slide